Rainier

Rainier

Wednesday, February 3, 2016

Mountain Training: It Takes More Than Three Months

Let's talk about the realities of mountaineering training. This is not going to be a feel good piece about how you can go from couch to Rainier summit in two weeks. This is going to be a piece on what it really takes to get and keep your body mountain ready.

Let's start with an article that I have been watching make the rounds for the past few weeks on 'How to Train for Mt. Rainier In Just 3 Months'. While this may technically possible it takes a LOT longer than three months to properly prepare to climb a mountain like Rainier.  It takes even longer to prepare to climb something bigger.


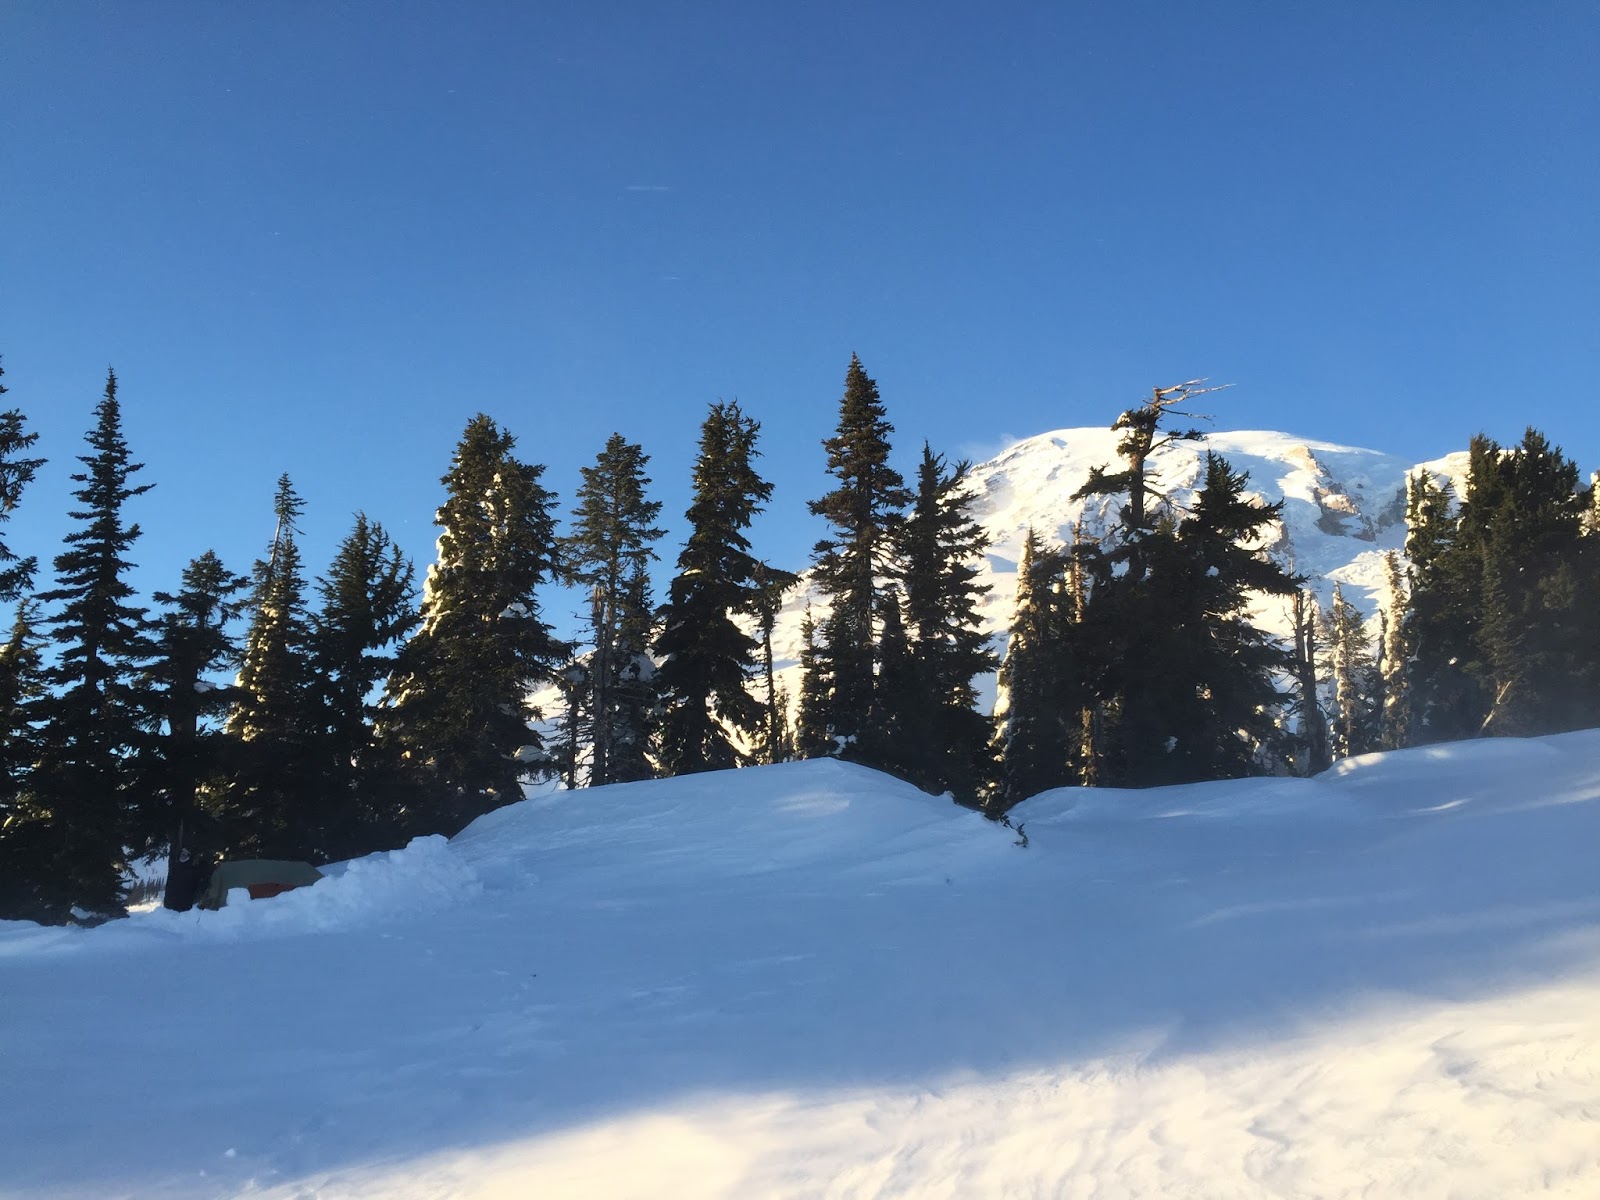
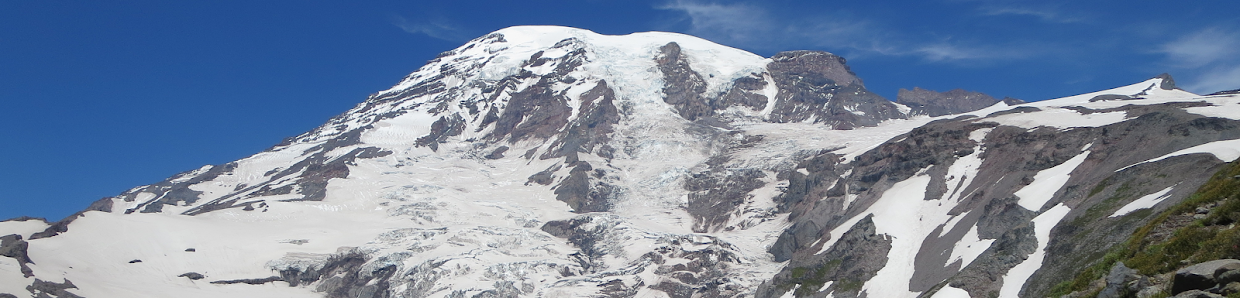
The Camp Muir Slog at 9,700 ft

I  get concerned every time I see articles like these that the author is leaving out key details, setting up the reader for disappointment, or, worse yet, creating a future safety situation on the Mountain. This is not cool. I will spend some time later on the social contract aspect of mountaineering. For now though, let's have a real discussion about the hard realities of physical training.

Mountaineering training is a lifestyle. This lifestyle requires a great deal of time, a tremendous amount of social sacrifice, a constant focus and expansion of your physical limits, and a commitment to train in all conditions. My friends have gotten used to me not committing to anything during training season on the weekends prior to Thursday. I am available only if NOAA and Atmos dictate that the Mountain is not accepting visitors. There are very few days off. The rewards though - they are so worth it.

I am committed to training six days a week with a mandatory rest day on the seventh. My personal schedule looks something like this with a mix between full body strength, leg specific, yoga, cardiovascular training, and activity specific training with a loaded pack. This is a basic outline with the amount of weight, hike distance, and pack weight increasing over time.


Monday:        Full Body Strength
Tuesday:        Legs Heavy Cardio (Ex. HiiT Cardio, Jumpboard, Skiing, etc)
Wednesday:   Full Body Strength
Thursday:      Yoga
Friday:           Cardio (Ex. Kickboxing, HiiT Cardio, etc)
Saturday:       Activity Specific Training with a Weighted Pack (Ex. Hiking, Backpacking, Stairs, etc)
Sunday:         Rest

This mix works well for me. This formula includes enough variety to maintain muscle confusion and at least two days a week to focus on cardio. I cannot overemphasize enough the importance of cardio. This is a newer focus in the past two years and my performance at altitude has improved dramatically in the thinner air. Your legs and core strength are key but everything falls apart if you are gasping for breathe.

Does this get boring? Oh yeah it does. Are there some days when the idea of going to the gym, of going anywhere, is the absolute last thing I want to do? Damn right. There are plenty of days when all I really want is to stay home, turn on the TV, and sit on the couch with a beer. I get tired of the endless smelly workout clothes laundry and the reality of the consistently aching muscles. (something always hurts - always)

I can assure you though that this lifestyle and a consistent commitment to fitness will keep you mountain ready. The confidence that comes in knowing that my legs, lungs, and heart are ready for anything at a moments notice is a freedom that I would not trade. It is worth every once of sweat, every aching muscle, and every weekend brunch I've missed. The mountains are always calling and I always want to be ready to go.

Please also see these amazing resources on other training approaches. I hope that you find, or have already found, the formula that keeps you trail ready. See you out there. We will share a beer at the summit. I'd also love to hear what works for you.

FitClimb - Rainier Training: http://www.fitclimb.com/page/mount-rainier-training-plan
Alpine Ascents - Rainier Training: https://www.alpineascents.com/pdf/info/rainier-muir-train.pdf


Monday, January 18, 2016

Risk Assessment: When Mother Nature Says No


I was recently provided with an important life lesson on outdoor risk assessment. This lesson was related to dealing with the reality when Mother Nature says no. She has no interest in your plans, level of preparation, and personal excitement. She calls the shots. It is up to us to listen.

I was proudly planning to lead a group of over thirty outdoor women on a snow camping adventure. Our group was a mix of experienced adventurers and incredibly courageous beginners. There were even one or two amazing women who had never backpacked before. Several had purchased or rented new gear for the adventure and the anticipation level was high. Several others had rearranged their personal and professional schedule. The trip was planned for the second of weekend of January at Paradise on Mt. Rainier. We all knew that winter weather can be fickle but we had no clue how decisive the signs would be.

I have a practice of checking four main weather information sources before any winter trip into the mountains. These resources, linked below, are NOAA, Atmos, Mountain-Forecast, and NWAC.  These sources are all fantastic in their own right and together paint a comprehensive picture of expected conditions. It is always important to check, double-check, and triple-check all resources to fully understand the risk and conditions profile. My Go/No-Go decisions for another outdoor adventure are always made on this criteria. The need for appropriate caution and smart decision making becomes even more important when leading others.

The conditions for our weekend were looking challenging but not impossible four days before the trip. All three weather resources were predicting 5 - 6 inches snow and light to mid level winds. The exact numbers changed as the date grew closer as they always do. The nature of mountain weather, especially on prominent peaks like Rainier, is extremely variable. I have made it a practice to trust nothing until the day before.

Our final decision was driven by the NWAC forecast. The NWAC forecast conditions were holding until the night before our departure and suddenly took a dramatic turn for the worse. The forecast at tree line went from Yellow/Moderate to Orange/Considerable. The forecast near tree line went from Orange/Considerable to Red/High. The forecast above tree line was the same. We were looking at an Orange / Red /Red combination as you moved up the mountain. This is an evil mix for any area near or above the tree line and Paradise very much qualifies. So did our last minute Plan B option of the Bouillon Basin area near Crystal Mountain Resort. There was simply no place to go without potentially putting my own and others lives at risk.


We were forced to make the hard decision the morning of the event. It was a difficult decision to cancel the trip. It was difficult to disappoint so many who had worked so hard to join us. It was an incredibly tough moment to announce that we could not go. This was a first cancellation experience for me in a group leadership position. I had no idea how difficult that moment would be. This was no comparison though to the potential alternate reality of risking my life and the lives of others. This I could not do. I would make the same decision again.

I consider myself blessed to have had access to the information required to make this choice. The amazing people at NWAC, NOAA, Atmos, and Mountain-Forecast allowed the group to make a comprehensive risk assessment. It was sad to be denied by Mother Nature but the reality check was a welcome lesson. It is her world out there and we are just visiting. I hope to always make the choice to grant her the respect she deserves.

Next time. The Mountain isn't going anywhere. It is important to always keep this in mind and live to adventure, climb, or explorer another day.

Mountain / Rainier Forecast Resources:
NWAC: http://www.nwac.us/avalanche-forecast/current/
NOAA: http://forecast.weather.gov/MapClick.php?lat=46.87&lon=-121.75
Mountain-Forecast: http://www.mountain-forecast.com
Atmos: http://www.atmos.washington.edu/data/rainier_report.html


Tuesday, January 12, 2016

Winter Camping: Lessons with Three Season Tents

We kicked off the New Year with a snow camping adventure on Mt. Rainier. The key goal for this adventure was to test out some new cold weather gear and layering systems. Be careful what you wish for - we got our test.

We arrived at Longmire in Mt. Rainier National Park at 10:00am on Saturday morning to collect our Wilderness Permit. We were advised that there were only two other parties with overnight permits on the Mountain that evening. This was of little surprise as the weather forecast promised an overnight low of 18 degrees, winds up to 20 mph, and snow arriving on Sunday afternoon. We knew we wouldn't have much company with that combination of conditions.

We set out from the Paradise parking lot by 11:00am after a slow and careful drive up from Longmire. Do not underestimate the driving conditions you will find in Mt. Rainier National Park during the winter months. The Park has a very different idea of road ploughing and the roads can and should be expected to be icy and snow covered. This weekend was no exception. We were in no hurry though as we were not planning to hike too far on this particular adventure. The temperatures and wind chill at 6,000 ft were plenty sufficient for our purposes.

Mt. Rainier Under a Blue Sky

The sky was incredibly clear as we set out toward Alta Vista. Do not let the picture fool you though. The predicted 20 mph winds were very present and frequently gusting at much higher velocity. We had a strong feeling that we were going to be in for it. We headed up toward Alta Vista with the intention to set up camp well below and to the West of Panorama Point.

Our first order of business after selecting our site was digging out a solidly built tent platform. We dug in approximately two feet and built a four foot snow wall to surround 50% of the tent body. Our lthree season Big Agnes Copper Spur puts up with conditions like a champion but can be quite noisy in high winds. We felt the strong need to do what we could to protect the tent and ourselves from the wind and driving sugar snow. The clear and dry conditions combined with the wind resulted in tiny pellets of snow flying everywhere. We staked down the tent securely with our snow anchors and finished our wind wall as quickly as possible. The finished construction can be seen on the lower left of the photo below.

Big Agnes Copper Spur Hiding Behind the Snow Wall

The temperature had dropped to below 20 degrees by the time the tent was fully pitched and the site secure. We were grateful to have allowed enough time to complete our setup, inside and out, before the sun started to set. We were warm and cozy inside our nylon fortress well before it was fully dark at 5:30pm. This feeling grew as we watched the thermometer continue to fall and watched unprotected water begin to freeze. It quickly became too cold to have any exposed skin even inside the tent. I crawled into my sleeping back in down booties, full face balaclava, fleece gloves, down pants, and mid-weight down parka.

I was fast asleep by 7:00pm lulled by the sound of the wind on the tent. I was woken periodically throughout the night though by stronger wind gusts and what I initially believed to be cold condensation on my face. Wrong. Despite our best efforts to securely stake down the tent and seal all vents and vestibules the snow had begun to sneak inside of the tent. The wonderfully ventilated mesh of our three season tent became an entry point for snowflakes. We woke up at 2:30am to discover a fine dusting of snow inside of our the tent. There was no choice at that point though but to seal up the sleeping bag a bit tighter and ride it out. It was 10 degrees inside the tent. This picture was taken *after* shaking snow off of the sleeping bags throughout the night.

Snow Isn't Supposed to be Inside the Tent

We were kept safe and warm through the use of our parka as a sleeping layer, down booties, and balaclavas. It would have been a miserable night without each of these items. We waited only until the road to Paradise re-opened in the morning at 9:15am to break camp and clear out as quickly as possible. The first moments inside the Paradise Visitor Center and out of the constant wind felt like bliss.

This trip taught us where the limit is between three season and four season shelter systems. We are now the proud owners of a brand new Marmot Thor 2p Four Season tent. This will be our new friend, at a weight increase of three pounds, for future snowy and windy adventures. This seems to be a fair trade-off to keep the snow outside of the tent walls where it belongs. Further research has also taught us that the one - two foot gap between the snow wall and tent should have been much closer.

Thank you to Mt. Rainier for continuing to be a powerful teacher. I am always grateful for adventures like these and opportunities to learn new lessons without significant consequence. That Mountain will not need to tell us twice. She won this round. I cannot wait for the next re-match.


Wednesday, January 6, 2016

Expedition Preparation: International Trip Logistics & Lead Times

I have come to the conclusion that planning an international climbing trip is a lot like planning a wedding. They are completely different events but many of the same rules apply. Both include similar lead time planning, the same dress rehearsals, and the same feelings of being overwhelmed by all of the details. (so many!)


Don't believe me? Let me explain it this way. The internet is full of wedding timetable calendars to help the bride plan the big day. These guides provide a high level outline of how early you should complete key events. These outlines suggest that you should have your caterers & florists confirmed 9 - 12 months in advance, your guest list 6 months in advance, your dress 3 months in advance, and so on. A major climbing expedition is the same. Your trip should be booked 12 - 9 months in advance, your travel insurance booked within 21 days after that, your gear confirmed and ready at least one month before departure, and so on. The same rules apply.

The only thing still missing is this same treatment for major international climbing adventures. I wish someone had outlined this for me when this adventure started! Here is my high level outline of what it really takes, and how long it takes, to prepare for an international climbing adventure.

I am currently at the ~60 day mark before the big day. This list below may tweaked as we get closer but here is the plan so far. It's quite a list!


  • As Soon As You Know You Want to Climb 'X' Mountain
    • Mountain Selection: Research Past Trips - Ex. Blogs, YouTube, Summitpost.com, etc
    • Guide Service - Selection: Select Your Guide Service - Interview as Many as You Can
    • Trip Itinerary - Selection: Confirm Your Trip Selection, Preferred Itinerary Options, and Cost Tolerance(s). 
    • Travel Insurance - Selection: Confirm Your Travel Insurance Selection & Options (Ex. Travelex)
  • 12 - 9 Months Before Departure
    • Guide Service - Trip Booking: Book Your Trip with Your Selected Guide Service (yay!)
      • Submit All Requirements Paperwork & Passport Photo Copies
    • Travel Insurance - Trip Cost: Purchase within 21 Days of Trip Purchase - Expedition Cost
    • Training - Outline: Initial Outline of Physical Training Schedule
    • Gear - Initial List: Initial Outline of Required Additional Gear Purchases (Ex. Double Plastic Boots)
  • 6 - 9 Months Before Departure
    • Airfare / Travel Agent - Initial: Establish Relationship with Travel Agent, if Using, for Airfare Booking
    • Physician / General Practitioner - Initial: Review Your Trip, Vaccine, Medications, and Physicians Clearance Letter Requirements with Your Physician. Most Guide Services Require a Physicians Letter.
    • Training - Start: Start Your Training! (Ex. Stair Climbing, Hiking, Snow Camping, etc)
    • Gear - Start Purchasing: Start Purchasing Your Gear. This Advance Lead Time Spreads the $$$ Pain and Supports Inventory Availability.
  • 3 - 6 Months Before Departure
    • Airfare / Travel Agent - Purchase: Confirm Purchase of Airfare Booking - Layover Hotels Too if Needed
    • Travel Insurance - Airfare: Update Existing Travel Insurance to Include Airfare Cost
    • Guide Service - Air Travel Details: Share Your Air Travel Details with Your Guide Service
    • Physician / General Practitioner - Medications: Confirm Your Required Medication Selection(s) & Prepare to Fill Prescriptions ~30 Prior to Departure
    • Vaccinations & Travel Medicine: Make An Appointment With a Travel Medicine Professional. Plan to Start Required Vaccines Before the Three Month Mark.
    • Training - Continue & Ramp-Up: Check in on Your Training Progress. Need to Change Anything? Do it Now.
    • Gear - Final Purchase List Confirmed: Your Complete Gear List Should be Finalized & Purchases On Their Way.
  • 90 Days Before Departure: 
    • Physician / General Practitioner: Confirm Physician Readiness to Write Required Prescriptions & Sign-Off on the Physician Release at ~30 Days Prior to Departure. 
    • Vaccinations & Travel Medicine: Confirm Final Vaccine Schedules. Complete Before the ~30 Days Prior to Departure Milestone.
    • Training - Continue & Ramp-Up: Check in on Your Training Progress. Add as Much Activity Specific Training as Possible w/ Your Actual Gear. (Ex. Boot Break-In)
    • Gear - Break-In: New Boots? Awesome! Start Breaking Them In! New Jacket? Cool! Take it Snow Camping! Use that Stuff to Make Sure it Works as Expected.
  • 30 Days Before Departure:
    • Physician / General Practitioner: Confirm Receipt of Physician Release & Fill Prescriptions.
    • Training - Finishing Touches: Are you Ready? Are you Sure? You Should Be.
    • Gear - Practice Packing: Practice Pack All of That Gear & Weigh It. Carefully Consider Applicable Weight Restrictions. (Ex. 15kg for Flights to Lukla) Make Any Final Purchases Now.
  • One Week Before Departure:
    • Final Packing: Pack That Bag. It's Time to Go! Batteries? Chargers? PLB Configurations? All Done and Ready.


Missing anything? I'd love to hear from you in the comments.

Tuesday, December 29, 2015

Why I Climb

One of the most prevalent and difficult questions received by mountaineers is 'Why do you climb'? I have heard this question from family, friends, and strangers more often then I recall. I will do my best to answer this question here.

So, why do we choose to spend most winter - spring weekends on the side of a mountain? Why do we willingly and enthusiastically drive hundreds of miles to carry 40+ pounds on our backs up thousands of feet? Why do we volunteer for cold feet, dehydrated food, the inside of a nylon tent, and 1:00am wake-up calls to step out into 20 degree weather? Why do we spend our weeknights obsessed with gear lists, armed with a kitchen scale, in pursuit of of a two ounce weight saving? Why indeed?

I will first offer the answer most commonly quoted by mountaineers. As famously stated by George Mallory, arguably the first to summit Mt. Everest with Andrew Irvine in 1924, mountaineers are driven by the central tenet that we climb "Because it's there". Part of me will always be sad that this quote, this terse soundbite, is the most well known legacy of this incredible pioneer. This statement does poor service to the complexity, respect for nature, and the internal struggles experienced in service to these pursuits. If we must turn to Mallory for wisdom I much prefer the alternate quotation - "Have we vanquished an enemy? None but ourselves."

With Mallory out of the way, no disrespect to those that have gone before, I'd like to talk about why I  personally choose to climb.

Mt. Rainier - Ingraham Flats Camp

Appreciation of Our Place in Nature: My first and primary reason is to remind myself, as often as possible, of my true place in nature. I feel strongly that is important to be in touch with our place in the universe. We, all of us, are tiny and fragile creatures in a great big world.

The wild places remind me that we are all but one small entity, no more or less important than the smallest chipmunk, but blessed with the powers of choice, autonomy, and appreciation. My time in these special places reminds me to respect our wide and wonderful world and take nothing for granted. Our time is short, these moments are precious, and our life is fleeting. We need to make the most of it at all times.

Summit Crater of Mt. Rainier


Our Capabilities Are Bigger Than We Think: This one is huge for me personally. There is a moment of fear at the start of every big climb, every new job, and every new learning experience. The self-doubt creeps in insidiously. Can I do this? Should I do this? What if I can't? Maybe I should just quit now? No. Never. Keep going.

These experiences teach me, again and again, that it is alright to feel fear. It is alright to feel overwhelmed. It is alright to sit in these moments but not for too long. These moments can be acknowledged but must then replaced with the resolve to move past them. You can reach that summit. You can keep going. You will reach your goal.

It might hurt, it might be harder than you expected it to be, and it might take several attempts before you get it right. But it will happen. The moments of breakthrough, in climbing and in life, are made that much sweeter by the effort required to achieve them. I have never achieved anything important without first seriously quitting at least once - at least twice on the way up Rainier! We are made better by pushing through these moments. The first step on the summit always makes it all worth it.

First Light on Mt. Adams Summit Push

Moments of Pure Joy: It seems that every outdoor adventure brings with it at least one moment of pure joy. This is what I chase. It isn't the adrenaline, it isn't the overcoming of fear, and it isn't proving myself in a male dominated outdoor arena. These are all worthy side goals but these are not the heart of the pursuit.

The photo above captures one such moment. This was taken in 2014 at approximately 9,900 ft on the summit push of Mt. Adams. My husband (seen here), myself, and a dear friend had spent the night at 8,500 ft. and started for the summit at 3:45am. This photo was taken at around 5:00am as the very first light hit the false summit of the mountain. There was something intensely magical about sharing this breathtaking moment with people I love. In this space everything was exactly at it should be. I will remember this moment for the rest of my life.

I have experienced similar moments on the shores of alpine lakes, on chair lifts with the sun on my face, and on warm rocks in flower meadows. Everyone has their special places and precious experiences that brings them their own version of pure joy. These moments are mine.


Monday, December 28, 2015

Expedition Preparation: Vaccines & Medications

I have noticed over the past weeks and months that there is a wealth of online information on certain areas of Himalayan travel. Every blog and every guide service has multiple posts dedicated to gear and training. (I will too very soon!) These are important but only a part of the overall preparation scope.

You know what these sites don't seem to spend time on? The required vaccines and medications. I can only imagine that this is either glossed over or ignored due to their overall lack of shininess. No one wants to include the potential side effects of dexamethasone and whether or not to get the rabies shot in their summit fantasies. And, while I completely understand this impulse, this remains an overlooked but highly critical part of expedition preparation.

Not My Actual Pill Bottles - Too Few
Your required vaccines and medications are a very important topic - no one wants typhoid - requiring a great deal of upfront planning, risk analysis, and significant financial investment. This is top of mind as I will be journeying to get my second of three Hepatitis A/B vaccines this afternoon. We also filled most of our required medications a little over a week ago - the pile is impressive! (not my actual pill bottles)

NOTE: These information is provided to represent my experience alone and not intended as a source of medical advice. Always consult your physician to access your individual medical needs.

There are three primary sources of information in determining what vaccines are required for international travel. The first source to consult is the CDC Travel section. This amazing resource is a great first step in determining your traveler profile, destination, and overall risk profile for disease exposure. A traveler to the rural interior of Brazil will have very different needs from a traveler to the high altitude areas of Nepal. This resource will provide you with a list of Recommended and Optional (Some Travelers) vaccinations for most world destinations and excellent guidance on general travel health considerations.

So Shiny and Pointy
The second resource is your local Travel Physician Clinic and/or a qualified General Practitioner. We are lucky in the Seattle to have access to the Travel Clinic at the University of Washington. Most other major metropolitan areas and/or medical schools should have similar resources. We worked with the University of Washington to schedule a consultation with a Physician experienced in both travel medicine and high altitude preventative and acute care. We were pleasantly surprised to learn that our physician had previously been to over 18,000 ft. and was very versed in AMS related regimens.

The third resource is your guide service. International Mountain Guides maintains a high level list of recommended vaccines and medications within their larger expedition form packet. (see section 5 - Physician's Certificate) Most larger guide services seem to provide similar conversation starting points for physicians. Your guides can also provide you with an excellent resource on their own preparation approaches, client stories, and expedition specific advice.

So, where did all of these bring us you ask? Our final list of vaccines and medications are noted below with a brief description of each. The total cost of these items, over and above our expedition cost, is expected to be $700. Note that this amount does not count the potential rabies vaccination we may also elect to receive. This vaccination, addressing a low risk but very serious and fatal disease, would add an additional $1,300 to the existing $700 total.

I am sharing these here to emphasize the reality of the risks and medical preparation requirement, in practical, financial, and emotional fronts, of a climb over 5,500 meters / 18,000 ft. This is an amazingly serious adventure but also impressively serious business.

  • Vaccinations:
    • Routine Childhood / Maintenance Vaccines: Polio, MMR, TDap, Flu, etc.
    • Hepatitis A & B - Twinrix: The Twinrix hepatitis A / B combination vaccine is administered over a period of one month in three doses. This vaccine is administered in your upper arm. The CDC notes an expected > 98% protection against both types of hepatitis one month after the third dosage. We elected for the accelerated option in the interest of time. Cost: $105 /per Dose - $315 Total
  • Medications:
    • Azithromycin / Zithromax: Zithromax is a general purpose antibiotic used to combat a range of conditions from respiratory infections to general bacterial gastrointestinal distress. (Ex. travelers diarrhea)
    • Ciprofloxacin: This is a much more powerful bacteria fighting antibiotic. This is used only in more serious situations as this drug can have a powerful negative side effect on the strength of tendons.  This is obviously not desired on a highly physical adventure.
    • Tinidazole: The intended purpose of this antibiotic is in response to an infection of Giardia or Beaver Fever. Isn't that a fun thought in rural facilities?
    • Advair HFA: This is a steroid inhaler intended for the purposes of combating the 'Khumbu Cough' or respiratory irritation, accompanied by cough, brought on by exertion in cold and dry air. 
    • Acetazolamide / Diamox: This drug is the first of three in the arsenal against AMS - Acute Mountain Sickness. This condition can start in some individuals at quite low attitudes and can present itself as nausea, headache, disorientation, and/or swelling of the brain and/or heart. This condition can be fatal. Diamox works as a preventative by acidifying the blood, which causes an increase in respiration and arterial oxygenation and thus aids acclimatization.
    • Dexamethasone: This is the second of three in the arsenal against AMS. This particular medication is focused on the treatment and stabilization of symptoms of HACE - High Altitude Cerebral Edema. We clearly hope not to need this medication - at all.
    • Nifedical: This is the third in the arsenal against AMS. This particular medication is focused on the treatment and stabilization of the symptoms of HAPE - High Altitude Pulmonary Edema. This we also do not want to need - at all.

I hope this was helpful to you. I promise a more fun and lighthearted post for our next visit. In the meantime, happy medication reading!


NOTE: These information is provided to represent my experience alone and not intended as a source of medical advice. Always consult your physician to access your individual medical needs.


Wednesday, December 23, 2015

We Are Going to the Himalayas!

Words cannot truly express how exciting it is to type those words. We. Are. Going. To. The. Himalayas.

The Himalayas are a natural obsession of every mountaineer, beginning or advanced,  and a long time dream of mine. The Himalayas are home to the tallest mountains in the world and some of the most breathtaking scenery on earth. I simply cannot wait to see Everest, Ama Dablam, Lhotse, and so many other famous vistas with my own eyes.
Lobuche Peak

We will be climbing in the Spring of 2016 with International Mountain Guides on summit climbs of Lobuche East and Goyko Ri. The tallest of these mountains - Lobuche - is classified by Nepal as a 'Trekking Peak' which is a bit of a deceptive term. This term does not imply anything but elevation - a trekking peak is any mountain requiring true mountaineering skills and under 7,000 meters or 22,970 ft in elevation. Other well known peaks such as Island Peak, Mera, and Tent Peak are also included in this category. These are certainly smaller than their over 7,000 meter cousins but are serious mountains in their own right.

Everest Region - Lobuche Marked by Green Dot
Both of these mountains are located in the Khumbu region of Nepal right next store to Everest. We will be traveling into the Khumbu region following the traditional counter-clockwise route from Lukla to Everest Base Camp. Our travel companions for the first leg of the journey will be the first wave of Everest climbers on the Classic Climb Western Guided option. The journey up from Lukla will take almost two weeks, with three acclimatization days at Everest Base Camp, before pushing on to the Lobuche summit attempt five days later. The journey will next take us to Goyko Ri after bidding farewell and good luck to the Everest climbers. We will be in Nepal for a month total.

The climb of Lobuche is a technical climb requiring the use of fixed lines, crampons, and ice axes to reach the false summit at approximately 300 ft lower than the true summit at 20,075 ft. The continuation from the false summit to the true summit requires a high degree of technical climbing, including 2000+ ft of rappelling, in an area of very high exposure. I will be quite content with the false summit objective. An amazing video of the view from the summit has been uploaded here: https://www.youtube.com/watch?v=UTee4r5rnT0

Lobuche Summit View of Everest Massif

I will be blogging more frequently as we prepare for this journey. I will do my best to cover the topics of training, gear, health preparations, and other considerations for a journey of this scope. We have already encountered a few surprises not covered in other information sources.

As a side note, we also had the pleasure of climbing Mt. Rainier with IMG in the summer of 2015 and are proud to be journeying with them again. The IMG team provides amazing support, top notch guides, and top-notch skills training in the mountains. It is incredibly important to know that you are in good hands when you are up high.

Other Online Sources on Himalayan Climbing:

Alan Arnette - Top Notch: http://www.alanarnette.com
Mark Horrell - Great Insight Into the Overall Climbing Environment: http://www.markhorrell.com
Paul Pottinger - Account of 2015 Everest Climb: http://pottinger.net/osm/